



At a Glance
- 12 measurements, about 10 minutes, one soft tape measure. Write each number down as you take it.
- Report your true body measurements. The tailoring allowance is already built into the size chart.
- A 40 inch chest orders a size 40 jacket, not a 43. Jackets carry 3 inches of allowance, trousers 2.
- 3 of the 12 need a second person: shoulders, jacket length, and the back of the chest.
- Between sizes, size up. A jacket can be taken in at the waist. It cannot be let out at the shoulders.
In This Guide
Measuring yourself for a suit takes 12 measurements and about 10 minutes. You need a soft tape measure, a mirror or a second person, and something to write on. Work through the list below in order, write every number down as you take it, and do not round anything up.
Every number here is a body measurement, not a garment measurement. Studio Suits adds the tailoring allowance for you, so a 40 inch chest orders a size 40 jacket, not a 43.
What You Need Before You Start
- A soft tape measure, the fabric kind used for sewing. A steel builder's tape will not follow the curve of your body.
- A mirror, or better, a second person. 3 of the 12 measurements are difficult to take accurately alone.
- A notepad or your phone. Write each number down as you take it rather than at the end.
- Close-fitting clothes. A t-shirt and briefs is ideal. Measuring over a sweater adds an inch to your chest before you start.
- The shoes you plan to wear with the suit, for the inseam and outseam only.
Stand upright, feet together, arms relaxed at your sides. Do not hold your stomach in. A suit measured on a held breath will be uncomfortable every time you wear it.
The 12 Measurements
1. Neck
Wrap the tape around the base of your neck, sitting where a shirt collar would sit, just above the collarbone at the front and across the bony bump at the back of your neck. Keep the tape flat against the skin and leave enough room to slide one finger underneath.
The common error is measuring too high, up on the soft part of the neck. That gives a smaller number and a collar that chokes.
2. Chest
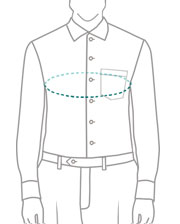
Measure around the fullest part of your chest, usually level with the nipples, with the tape running under your armpits and straight across your shoulder blades at the back. Keep it horizontal the whole way round. Snug against the body, not compressing it.
Breathe normally and take the reading on a relaxed breath. The common error is expanding the chest or flexing, which produces a jacket that hangs loose the rest of the time.
3. Shoulders
Measure across your upper back, from the outer edge of one shoulder to the outer edge of the other. The outer edge is the point where the flat top of your shoulder turns down into your arm. Let the tape follow the curve of your back rather than pulling it taut across.
This is the one measurement you should not attempt alone. The common error is measuring across the front of the chest instead of the back, which reads short.
4. Sleeve Length
Let your arm hang at your side with a slight natural bend at the elbow. Measure from the same outer shoulder point used above, down the outside of the arm, to the wrist bone.
The common error is straightening and locking the arm, which adds up to half an inch. Measure the arm as it actually rests.
5. Bicep
Wrap the tape around the widest part of your upper arm, roughly halfway between shoulder and elbow, with the arm relaxed and hanging down. Keep the tape level.
Do not flex. A flexed bicep reading produces a sleeve that is loose everywhere except when you tense.
6. Waist
Measure around your natural waist, which is the narrowest part of your torso, above the navel and below the rib cage. Bend to one side and the crease that forms marks the spot. Keep the tape level all the way round and snug without indenting the skin.
The common error is measuring where your trousers currently sit, which for most men is 2 to 3 inches lower and gives a larger number.
7. Hips
Measure around the broadest part of your hips and seat, usually 7 to 9 inches below the natural waist. Stand with your feet together and check in the mirror that the tape is level front to back.
The common error is letting the tape slope down at the back, which is easy to do and always reads long.
8. Inseam
Measure from the crotch seam straight down the inside of the leg to where you want the trouser hem to finish. Wear the shoes you will wear with the suit.
The common error is measuring barefoot. Shoe height changes where the hem should land, and a barefoot inseam gives trousers that sit short.
9. Outseam
Measure from your natural waist, the same point used in measurement 6, down the outside of the leg to the same hem point as the inseam. Keep the tape against the leg rather than letting it hang free.
The common error is confusing the outseam with the inseam. The outseam is always the longer number.
10. Jacket Length
Start at the bony bump at the base of the back of your neck and measure straight down your back to where you want the jacket to finish. As a reference point, a jacket that covers the seat and ends around mid crotch is standard.
The common error is guessing the end point without checking it in a mirror.
11. Thigh
Standing, wrap the tape around the thickest part of your upper leg, just below the crotch. Keep it snug but not squeezing.
The common error is measuring while seated, which reads 1 to 2 inches larger than standing.
12. Wrist
Measure around the wrist bone, where a shirt cuff would sit. Leave a small gap so a cuff can move.
The common error is pulling the tape tight against the bone.
Suit Size Chart: Studio Suits Ready Sizes
If you are ordering a ready size rather than a fully custom cut, find your body chest measurement in the left column. The other columns are the finished garment measurements for that size, in inches.
Jackets, Regular length
| Size (US) | Shoulder | Chest | Stomach | Sleeve | Jacket Length |
|---|---|---|---|---|---|
| 36 | 17.5 | 39 | 36.5 | 24 | 29 |
| 38 | 18 | 41 | 38.5 | 24.25 | 29 |
| 40 | 18 | 43 | 40.5 | 24.5 | 29.5 |
| 42 | 18.5 | 45 | 42.5 | 25 | 30 |
| 44 | 19 | 47 | 44.5 | 25.25 | 31 |
| 46 | 19.5 | 49 | 46.5 | 25.5 | 31.5 |
| 48 | 20 | 51 | 48.5 | 25.5 | 32 |
| 50 | 20.5 | 53 | 51 | 26 | 32.5 |
| 52 | 21 | 55 | 53 | 26 | 33 |
The garment chest is 3 inches larger than the size number in every row. That gap is the tailoring allowance, and it is already built in. A 40 inch body chest orders a size 40. Do not order a 43 because your chest is 40.
Trousers
| Size (US) | Waist | Hip | Thigh | Leg Opening | Front Rise |
|---|---|---|---|---|---|
| 30 | 32 | 37 | 23.5 | 14 | 10.5 |
| 32 | 34 | 39 | 25 | 14 | 10.75 |
| 34 | 36 | 42.5 | 25.5 | 14.5 | 11 |
| 36 | 38 | 44.5 | 26.5 | 15 | 11 |
| 38 | 40 | 46.5 | 27.5 | 15.5 | 11.5 |
| 40 | 42 | 48.5 | 28.5 | 16 | 12 |
| 42 | 44 | 50.5 | 29.5 | 16.5 | 12.5 |
| 44 | 46 | 53.5 | 30.5 | 17 | 12.5 |
| 46 | 48 | 55.5 | 31.5 | 18 | 13 |
Trousers carry a 2 inch allowance on the waist. Order the size that matches your body waist.
International sizes. US and UK jacket sizes are identical. European sizes are the US number plus 10, so a US 40 is a EU 50.
Short and Long jacket charts, the cm versions, and a printable measurement form are on the Studio Suits size chart.
The Faster Route: Measure a Jacket That Already Fits
If you own a jacket that fits you well, measuring it flat is faster than measuring yourself and usually more accurate, because a garment does not breathe or shift.
Lay the jacket flat on a table, buttoned, with the sleeves straight and no creases. Then take 5 measurements:
 Shoulder
 Chest
Chest
 Stomach
 Sleeve
 Length
- Shoulder. Seam to seam across the back, following the curve.
- Chest. Straight across from armpit to armpit, then double it.
- Stomach. Straight across at the narrowest point of the waist, then double it.
- Sleeve. From the shoulder seam to the end of the cuff.
- Length. From the base of the collar at the back, straight down to the hem.
Compare those 5 numbers against the chart above and order the closest size. For trousers, measure waist, hip, thigh, leg opening, and front rise the same way.
 Waist
Waist
 Hip
Hip
 Thigh
Thigh
 Leg opening
 Front rise
This route also works as a check on your body measurements. If the two methods disagree by more than an inch, take the body measurement again.
How to Avoid the 5 Most Common Measuring Mistakes
- Measuring over clothes. A sweater or thick shirt adds up to an inch across the chest and waist. Measure in close-fitting clothes or none.
- Pulling the tape tight. The tape should sit against the skin without pressing into it. Every inch you pull out of the tape comes back as a suit that is too small.
- Adding your own allowance. The chart already includes it. Report your true body measurements and let the tailoring do the rest.
- Measuring alone where you should not. Shoulders, jacket length, and the back of the chest are all difficult to reach and easy to misread. Get help for those 3.
- Not writing numbers down as you go. Take the reading, write it down, then move on. Recalling 12 numbers at the end is where most errors enter.
Take every measurement twice. If the two readings differ, take a third.
What to Do If You Are Between Sizes
Size up. A jacket that is slightly large can be taken in at the waist and the sleeves shortened. A jacket that is slightly small cannot be let out beyond the seam allowance, and on the shoulders it cannot be altered at all.
Two exceptions:
- If your chest and waist point to different sizes, order on the chest. The chest and shoulders drive the fit of a jacket. The waist is the easiest part to alter.
- If you are between sizes on trousers, order on the waist, then choose the leg shape separately. Thigh and leg opening are set by the fit style, not the size number, and the fit style guide explains what each one does.
If you are ordering fully custom rather than a ready size, none of this applies. Send the 12 measurements as taken and the cut is built to them.
Once your numbers are down, browse men's suits or men's jackets and enter the measurements at checkout.
Suit Measurements: Frequently Asked Questions
Can you measure yourself for a suit alone?
Mostly, yes. 9 of the 12 measurements can be taken alone with a mirror. Shoulders, jacket length, and the back half of the chest measurement are the 3 that need a second person, because you cannot see or reach across your own back while holding the tape level. If nobody is available, measure a jacket that already fits you instead and use those numbers.
What should you wear when measuring yourself?
Close-fitting clothes, or nothing over the area being measured. A t-shirt and briefs works. Avoid sweaters, jackets, and anything padded, which can add an inch to the chest and waist. Wear the shoes you intend to wear with the suit for the inseam and outseam, and nothing on your feet for the rest.
How tight should the tape measure be?
Snug against the skin without compressing it. You should be able to slide one finger under the tape at the neck, and the tape should not leave a mark or an indentation anywhere else. If the tape moves when you shrug, it is too loose. If your skin bulges above or below it, it is too tight.
What measurements do you need for a custom suit?
For a full custom suit, all 12: neck, chest, shoulders, sleeve length, bicep, waist, hips, inseam, outseam, jacket length, thigh, and wrist. For a ready size, you need 2 to place the order, chest for the jacket and waist for the trousers, though the full set still gives a better result.
How accurate do suit measurements need to be?
Within half an inch on the chest, waist, and shoulders. Those 3 determine whether a jacket sits correctly. Sleeve length and jacket length are more forgiving because both can be altered afterwards. An error of more than an inch on the shoulders is not fixable once the jacket is cut, which is why that measurement is worth taking twice.